
Securing your HTML Page with JavaScript location.assign() Method
5 years ago
5 mins readHello beautiful developers 👋.
Sometimes we might want to prevent the users from accessing a particular webpage on our website until they are either signed in or have completed a required step.
Wait!!! Let me show you what I mean 👇.
Using a dashboard page, for example, users who are not yet authenticated, (let's say signed in) should not be able to access this golden page and should be redirected back to the login page.
I hope that makes a little sense now?
You can check out the live preview of what we will be building in this article HERE
Now let's see how this is achievable using the window.location.assign() method.
1. Login Page - login.html
This page doesn't need any protection, it is not our business and it can be referred to as a public page, which authenticated and unauthenticated users can access for free, our login page has two buttons one for the users to visit the dashboard and the other to set their authentication status to true.
This tutorial will not cover building a complex login logic, so the Authenticate Me button and
localstoragewill do just that for us.
<!DOCTYPE html>
<html lang="en">
  <head>
    <meta charset="UTF-8" />
    <meta http-equiv="X-UA-Compatible" content="IE=edge" />
    <meta name="viewport" content="width=device-width, initial-scale=1.0" />
    <title>Document</title>
    <style>
      body {
        text-align: center;
      }

      h1 {
        font-size: 50px;
      }

      p {
        color: dodgerblue;
        background-color: dodgerblue;
        color: white;
        padding: 6px 12px;
      }

      button {
        color: dodgerblue;
        background-color: dodgerblue;
        color: white;
        padding: 6px 12px;
        text-transform: capitalize;
        border: none;
        cursor: pointer;
      }

      a {
        color: dodgerblue;
        background-color: dodgerblue;
        color: white;
        padding: 6px 12px;
        text-decoration: none;
        text-transform: capitalize;
      }
    </style>
  </head>
  <body>
    <h1>Login</h1>
    <p>Click the button to turn on authentication</p>
    <button onclick="authenticateUser()">Authenticate me</button>
    <a href="./dashboard.html">Goto dashboard</a>

    <script>
      // Function to authenticate a user
      function authenticateUser() {
        // Set authentication status to true
        localStorage.setItem("authenticated", true);
        // Redirect user to the dashboard
        window.location.assign("./dashboard.html");
      }
    </script>
  </body>
</html>
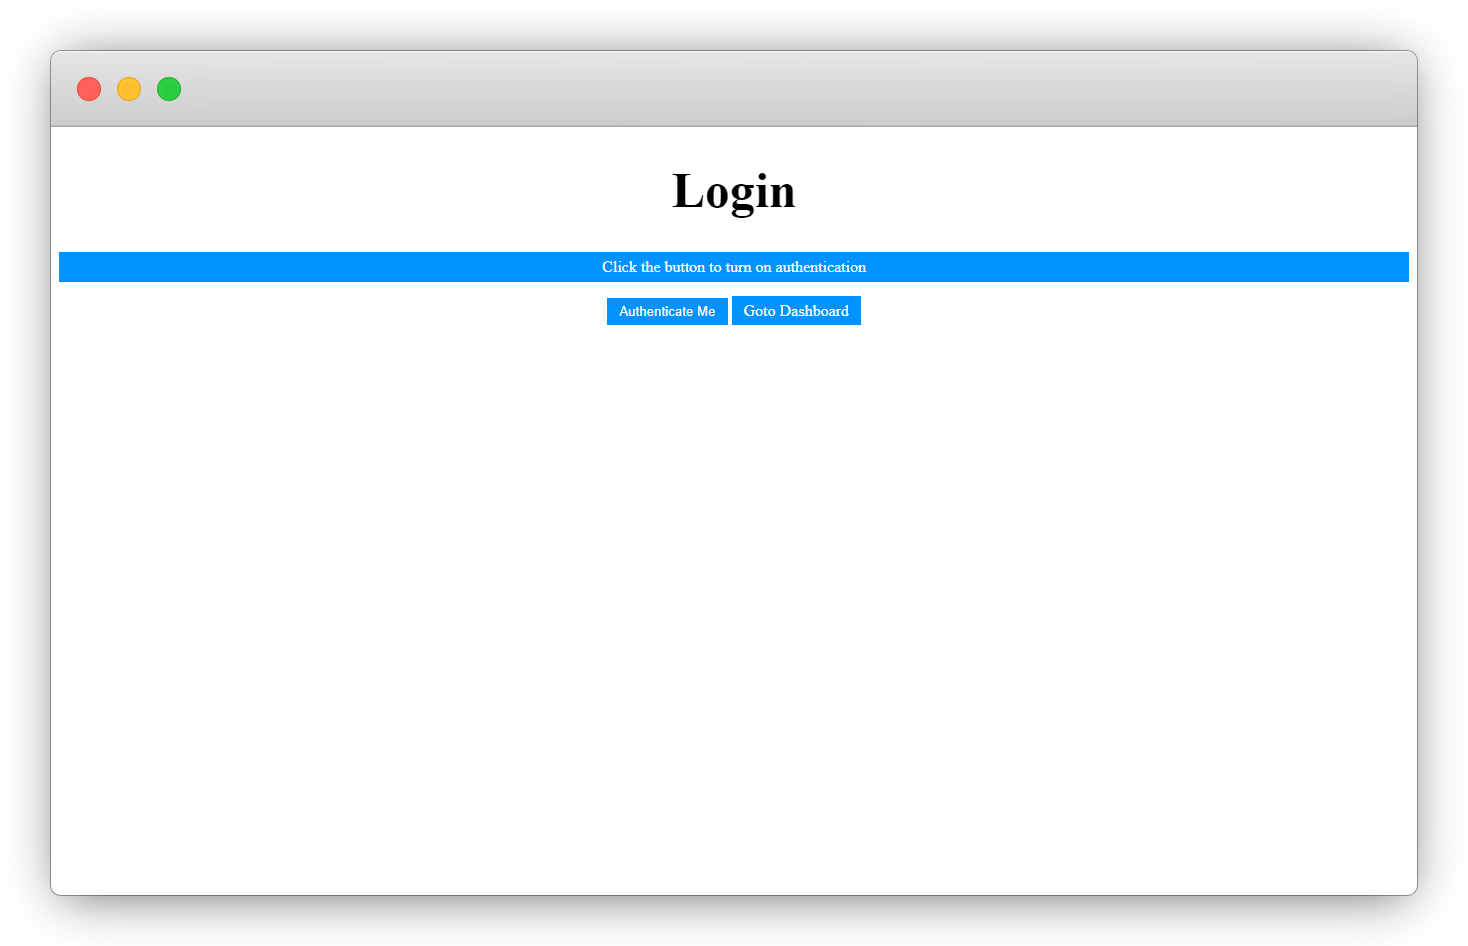
OUTPUT 👩💻
If everything goes well, you should have this displayed on your browser 👇.
Uhmm, but what's that JavaScript function doing there? 🤦♂️
Let me break it down

The Javascript Explanation:
- We have a function
authenticateUser()that runs when the user clicks theAuthenticate Mebutton - We set the
authenticatedto betruein our localstorage and, - Finally we redirect the user to the
dashboardsince they have beenauthenticated
The
localstorageserves as our database for this tutorial.
2. Dashboard Page - dashboard.html
This is our protected page, our business 😎, it is a private webpage and should only (and only) be accessible by authenticated users as discussed earlier.
Our task now is to protect this webpage from unauthenticated users 🛡
Copy the code below into your own dashboard.html
<!DOCTYPE html>
<html lang="en">
  <head>
    <meta charset="UTF-8" />
    <meta http-equiv="X-UA-Compatible" content="IE=edge" />
    <meta name="viewport" content="width=device-width, initial-scale=1.0" />
    <title>Dashboard</title>
    <style>
      body {
        text-align: center;
      }

      h1 {
        font-size: 50px;
      }

      p {
        color: dodgerblue;
        background-color: dodgerblue;
        color: white;
        padding: 6px 12px;
      }

      span {
        font-size: 20px;
        color: red;
        line-height: 6;
        font-weight: 700;
      }
      button {
        color: dodgerblue;
        background-color: dodgerblue;
        color: white;
        padding: 6px 12px;
        text-decoration: none;
        text-transform: capitalize;
        border: none;
        cursor: pointer;
      }
    </style>
  </head>
  <body>
    <h1>Dashboard</h1>
    <p>Welcome back</p>

    <span>This is a protected page</span>
    <br />
    <button onclick="logUserOut()">Logout</button>
  </body>
<script>
  // function to check if user is authenticated
  function checkAuthentication() {
    // authentication status
    const isUserAuthenticated = JSON.parse(
      localStorage.getItem("authenticated")
    );
    console.log(isUserAuthenticated);
    // Conditional statement to check if user is authenticated
    if (!isUserAuthenticated) {
      window.location.assign("./login.html");
    }
  }
  // invoke the function immediately the page loads
  checkAuthentication();

  function logUserOut() {
    localStorage.setItem("authenticated", false);
    setTimeout(() => {
      window.location.assign("./login.html");
    }, 2000);
  }
</script>
</html>
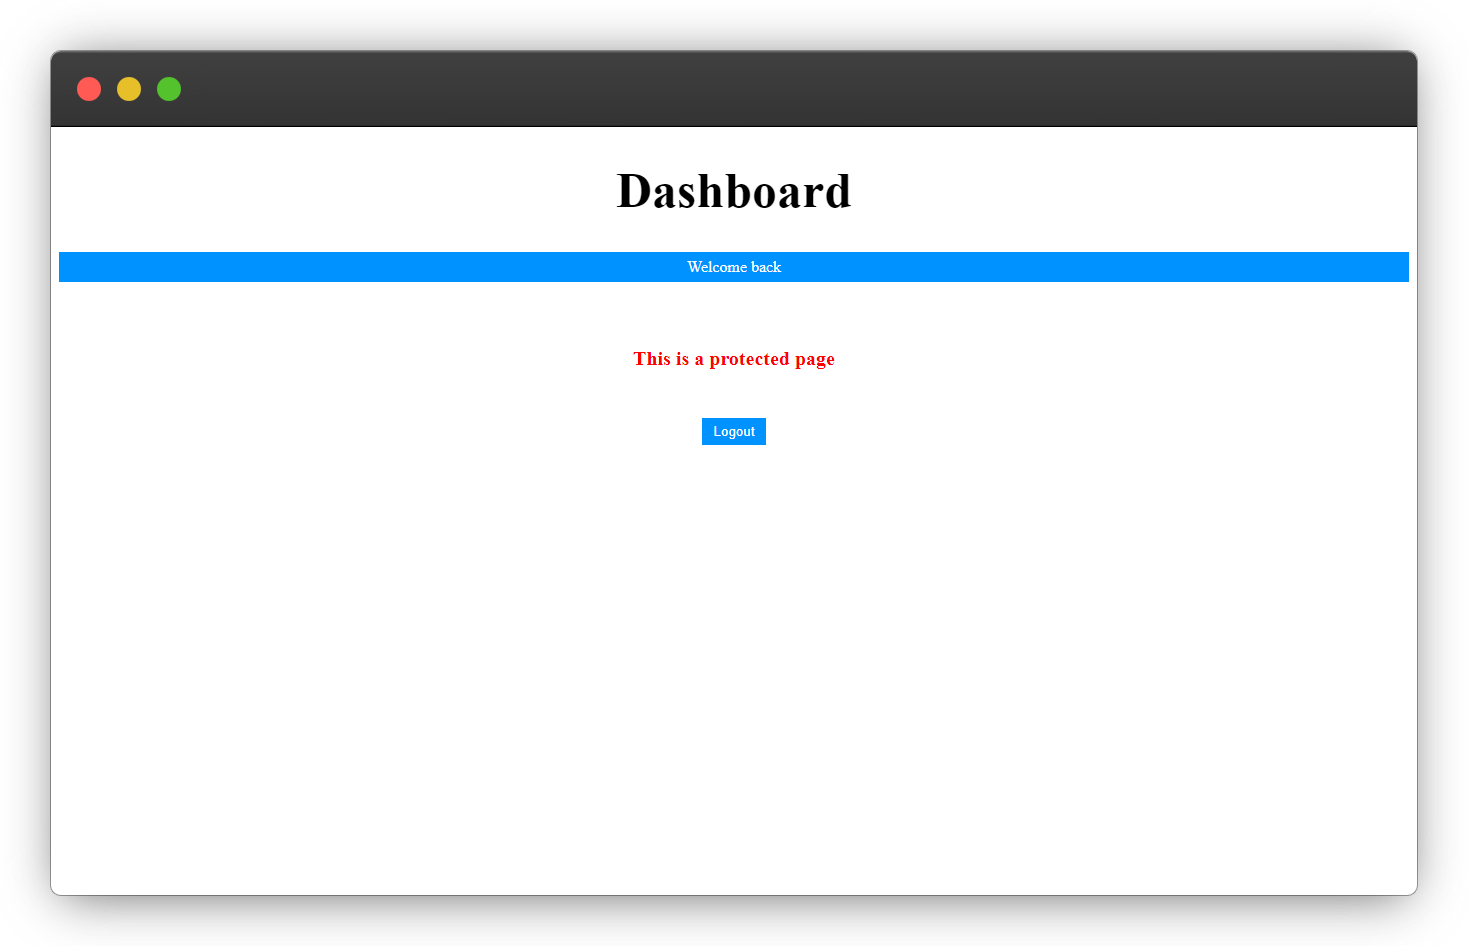
OUTPUT 👩💻
The dashboard.html should look something like this 👇

That's a lot of code up there, let's break it down into 1-2-3 and 4.

The JavaScript Explanation:
- We have a function
checkAuthentication()which checks the authentication status from the localstorage. - If the authentication status is
false, then the user is redirected back to the login page. - We also have a
logUserOut()function which set the authentication status to false in the localstorage. - And redirect the user back to the login page after 3 seconds.
The timeout is to enable the function to set the authentication status to false successfully before redirecting.
And that brings us to the end of this article, I hope you've learnt how to secure an HTML page using the window.location.assign() method?
You can also check out more articles on the window.location object 👇.
Wow, what a journey, I am glad you made it to the end of this article, if you enjoyed and learned something new from this article, I will like to connect with you.
Let's connect on
My friend and I are holding a meetup every Saturday to discuss JavaScript and other programming tips and to support ourselves.
You can be a part 👇 of the community by joining our WhatsApp group
See you in the next article. Bye Bye 🙋♂️
If you found my content helpful and want to support my blog, you can also buy me a coffee below, my blog lives on coffee 🙏.
Enjoyed this article?
Subscribe to my YouTube channel for coding tutorials, live project builds, and tech discussions.
Subscribe