
How to implement Dark Mode in JavaScript
5 years ago
6 mins readHello, my gorgeous friends on the internet 😍,
In this article, you will learn how to implement dark mode in JavaScript, I implemented this feature in one of my coming articles, so I think of extracting it for you guys 😎, you can check out what we will be building HERE before you continue reading.
Prerequisite
I assume you have worked with HTML, CSS, JavaScript functions and understand DOM a little bit, we actually do not need much 😁.
Without any further ado, let's get started

This article will be split into 3 parts
- HTML
- CSS
- JAVASCRIPT
1. HTML PART
Don't worry much about the markup, go ahead and copy-paste the code below 👇
<!DOCTYPE html>
<html lang="en">
<head>
<meta charset="UTF-8" />
<meta http-equiv="X-UA-Compatible" content="IE=edge" />
<meta name="viewport" content="width=device-width, initial-scale=1.0" />
<!-- Bootstrap -->
<link
href="https://cdn.jsdelivr.net/npm/bootstrap@5.0.1/dist/css/bootstrap.min.css"
rel="stylesheet"
integrity="sha384-+0n0xVW2eSR5OomGNYDnhzAbDsOXxcvSN1TPprVMTNDbiYZCxYbOOl7+AMvyTG2x"
crossorigin="anonymous"
/>
<link rel="stylesheet" href="./index.css" />
<title>Dark Mode Switcher</title>
</head>
<body>
<main class="blog container">
<div class="content">
<!-- Mode switch -->
<section class="mode-switch">
<div class="form-check form-switch">
<input
class="form-check-input shadow-none"
type="checkbox"
id="toggle-btn"
/>
<label class="form-check-label" for="toggle-btn"
>Toggle Dark Mode</label
>
</div>
</section>
<!-- Article section -->
<section class="article-section">
<article>
<h1 class="article-heading">
How to implement Dark Mode in JavaScript
</h1>
<span class="read-time text-muted">2 min read</span>
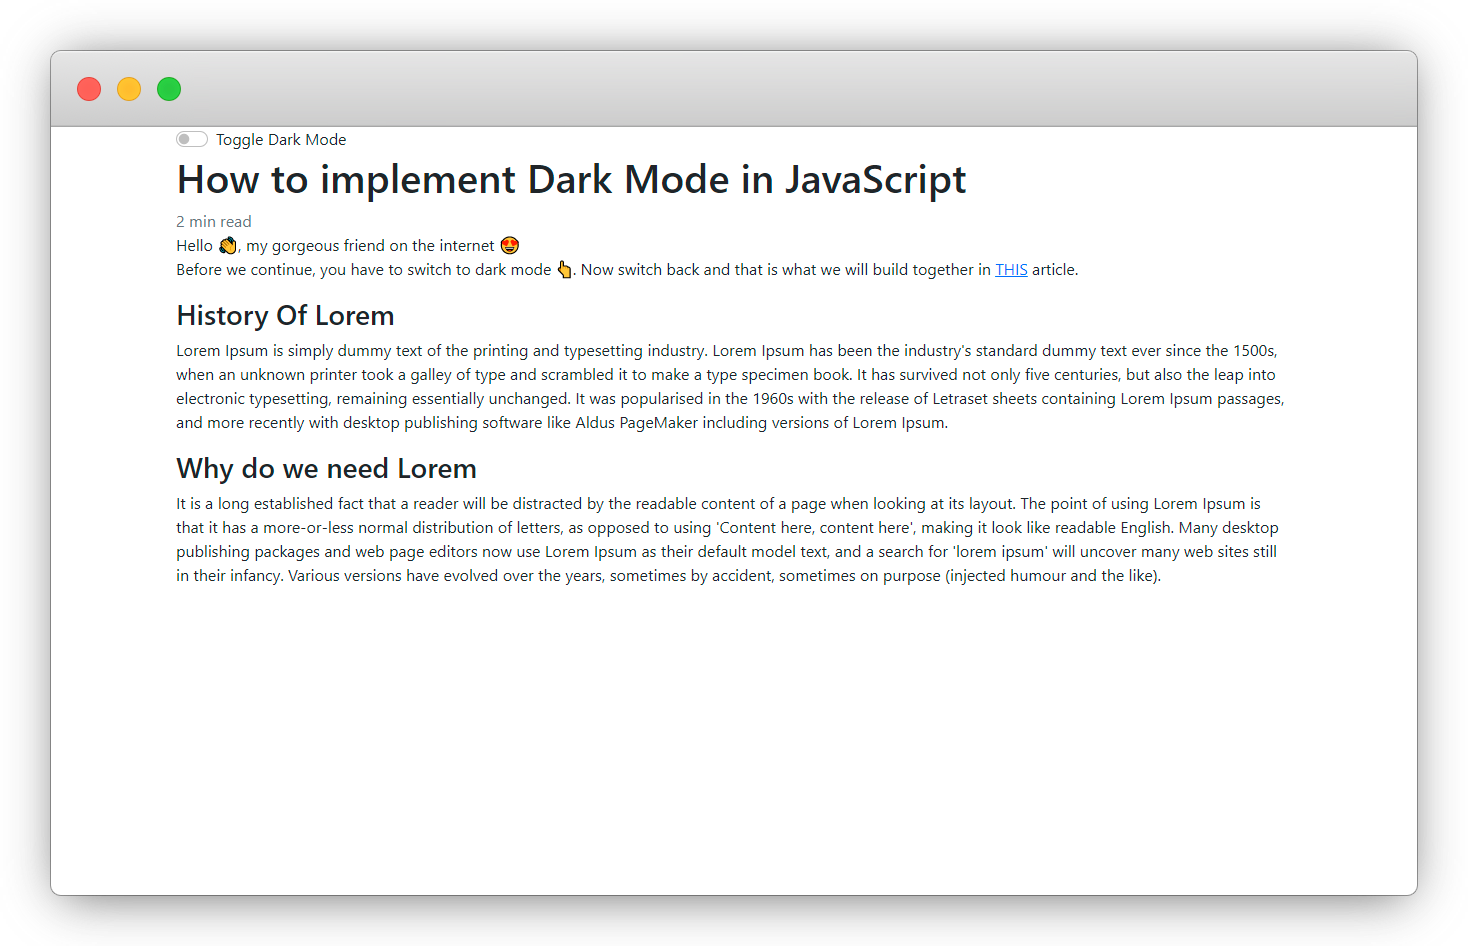
<p class="article-body">
Hello 👋, my gorgeous friend on the internet 😍
<br />
Before we continue, you have to switch to dark mode 👆. Now switch
back and that is what we will build together in
<a href="http://" target="_blank" rel="noopener noreferrer"
>THIS</a
>
article.
<br />
</p>
<h3 class="article-sub--heading">History Of Lorem</h3>
<p class="article-body">
Lorem Ipsum is simply dummy text of the printing and typesetting
industry. Lorem Ipsum has been the industry's standard dummy text
ever since the 1500s, when an unknown printer took a galley of
type and scrambled it to make a type specimen book. It has
survived not only five centuries, but also the leap into
electronic typesetting, remaining essentially unchanged. It was
popularised in the 1960s with the release of Letraset sheets
containing Lorem Ipsum passages, and more recently with desktop
publishing software like Aldus PageMaker including versions of
Lorem Ipsum.
</p>
<h3 class="article-sub--heading">Why do we need Lorem</h3>
<p class="article-body">
It is a long established fact that a reader will be distracted by
the readable content of a page when looking at its layout. The
point of using Lorem Ipsum is that it has a more-or-less normal
distribution of letters, as opposed to using 'Content here,
content here', making it look like readable English. Many desktop
publishing packages and web page editors now use Lorem Ipsum as
their default model text, and a search for 'lorem ipsum' will
uncover many web sites still in their infancy. Various versions
have evolved over the years, sometimes by accident, sometimes on
purpose (injected humour and the like).
</p>
</article>
</section>
</div>
</main>
<script src="./index.js"></script>
</body>
</html>
- If all goes well, your browser output should look something like this 👇
2. CSS PART
Copy-paste the CSS styles below 👇
@import url("https://fonts.googleapis.com/css2?family=Poppins:ital,wght@0,200;0,300;0,400;0,500;0,600;0,700;0,900;1,200;1,300;1,400;1,500;1,600;1,800;1,900&display=swap");

* {
  padding: 0;
  margin: 0;
  box-sizing: border-box;
  font-family: "Poppins";
}

#toggle-btn {
  cursor: pointer;
}

.blog {
  display: flex;
  flex-direction: column;
  justify-content: center;
  align-items: center;
  min-height: 60vh;
}

main .content {
  max-width: 90%;
}

.mode-switch {
  margin: 2rem 0;
}

.article-heading {
  text-transform: uppercase;
  margin-top: 2.5rem;
}

.article-sub--heading {
  margin-top: 2rem;
}

.article-body {
  margin-top: 1rem;
  line-height: 2;
}

/* DARK MODE */

.dark.blog {
  transition: 0.9 all ease;
  background-color: #202124;
}

.dark .content {
  color: #fdfdfd;
}

.dark .article-heading {
  font-weight: 800;
}

.dark .article-sub--heading {
  font-weight: 700;
}


@media (min-width: 900px) {
  main .content {
    max-width: 70%;
  }
}
- Your browser output should look like this 👇
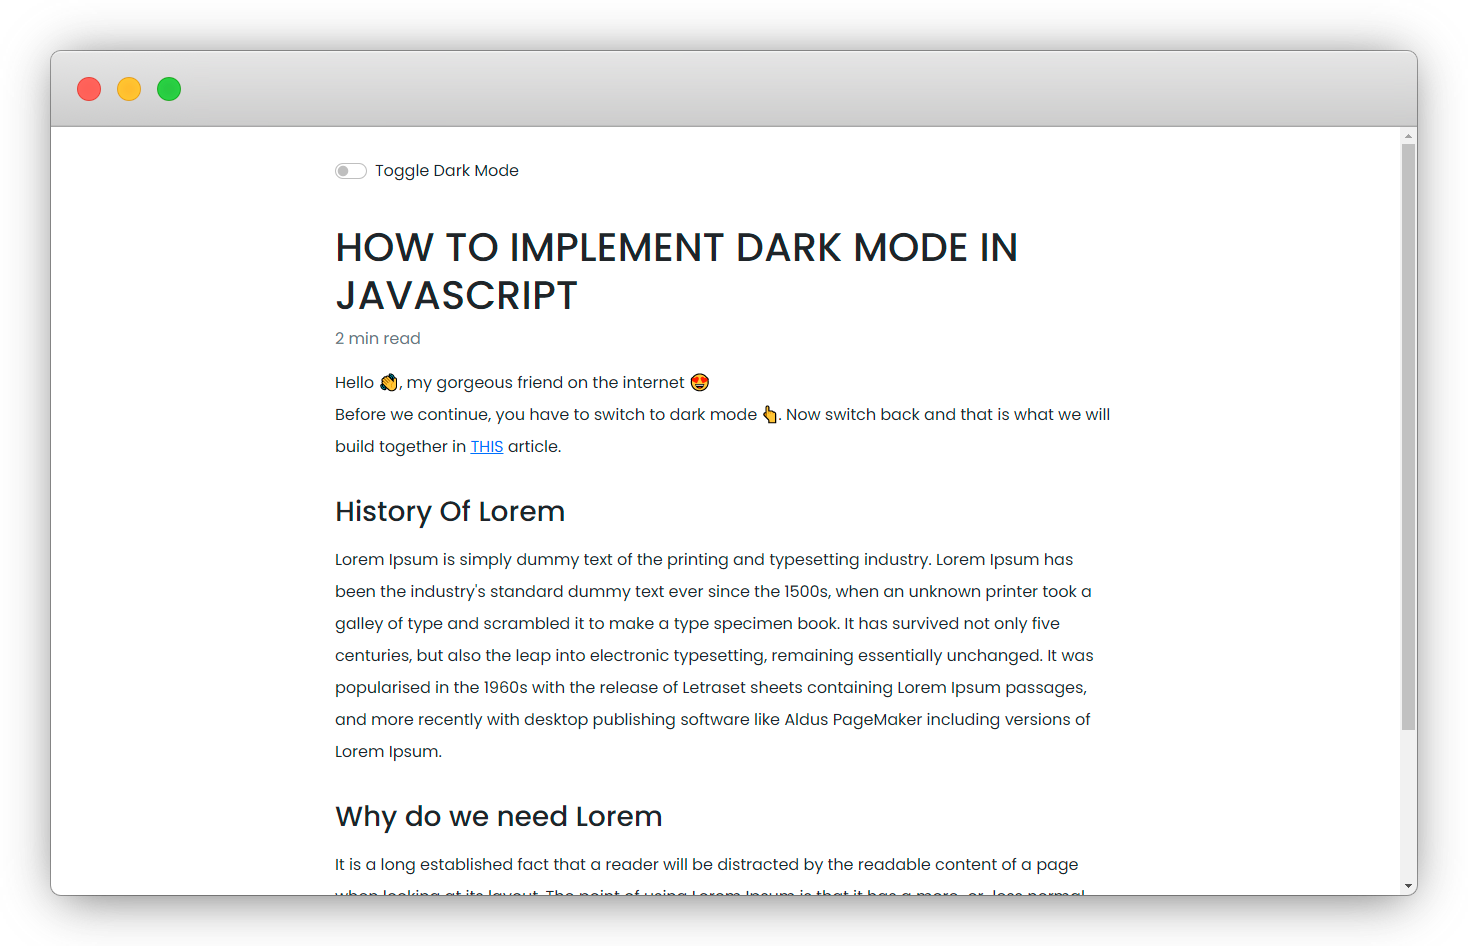
Explanation
What we just did under the hood in the CSS PART is that we declared a style rule for our dark mode version, which we are going to be using later.
Dark Mode Version Style 👇
/* DARK MODE */

.dark.blog {
  transition: 0.9 all ease;
  background-color: #202124;
}

.dark .content {
  color: #fdfdfd;
}

.dark .article-heading {
  font-weight: 800;
}

.dark .article-sub--heading {
  font-weight: 700;
}
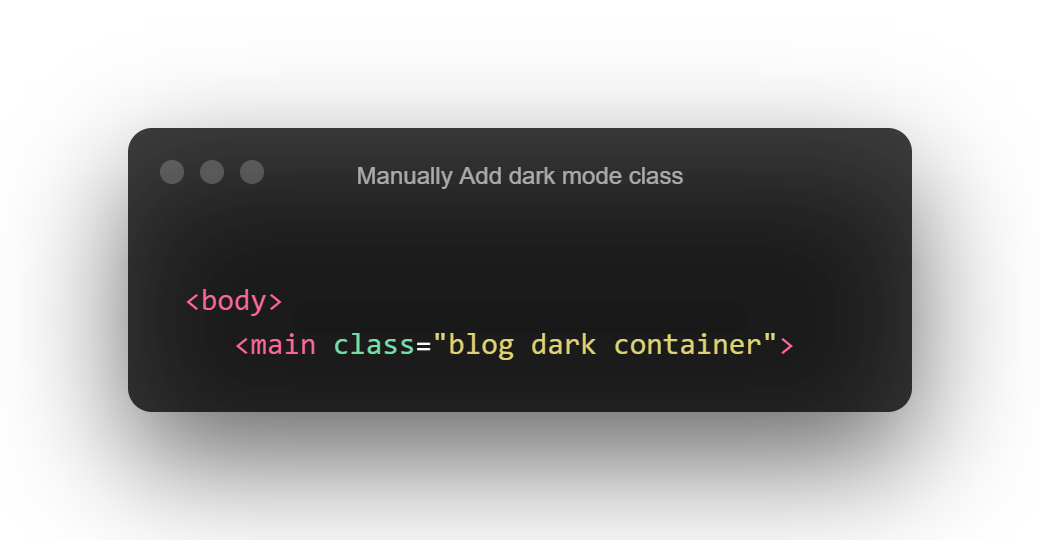
- To test this manually add dark to the main tag class attribute like below 👇
- You should have the dark mode displayed like below 👇

You should notice that the dark mode is having a more bold heading, you can specify more styles to define how you want the dark mode to look with the dark selector (don't forget the visibility of elements when styling dark-mode).
But this class will not be inserted into our HTML manually, we can't do that for each of our users, so remove it and let's proceed to use JavaScript.
3. JAVASCRIPT PART
Here is where the real work is, now that we know the class (dark) to inject into our HTML main tag, let us proceed to use JavaScript to automate the theme switching.
Copy Paste the code below 👇
// DOM
const blogContainer = document.querySelector(".blog");
const toggleButton = document.querySelector("#toggle-btn");

// Function to switch the theme
const switchTheme = () => {
  blogContainer.classList.toggle("dark");
};

// Bind event to the toggle button
toggleButton.addEventListener("click", switchTheme);
Explanation
In order to achieve the switching of theme, we need to do the following 👇
- Get access to the element (main) which we need JavaScript to inject the dark class into. ``` const blogContainer = document.querySelector(".blog");
- Have access to the switch button so we can bind a function into it later.
const toggleButton = document.querySelector("#toggle-btn");
- Create a function that will handle the action of toggling (switching) the *dark* class name inside the main tag
const switchTheme = () => { blogContainer.classList.toggle("dark"); };
- Finally, we need to bind the function to the switch button with an `eventListener`
toggleButton.addEventListener("click", switchTheme);
```
And that is it for this article,
Exercise:
You can try to implement a feature where your site remembers the last theme of the user, let me know if you need help in the comment section.
Wow, what a journey, I am glad you made it to the end of this article, if you enjoyed and learned from this article, I will like to connect with you.
Let's connect on
My friend and I are holding a meetup every Saturday to discuss JavaScript and other programming tips and to support ourselves.
You can be a part 👇 of the community by joining our WhatsApp group
See you in the next article. Bye Bye 🙋♂️
If you found this helpful and want to support my blog, you can also buy me a coffee below.
Enjoyed this article?
Subscribe to my YouTube channel for coding tutorials, live project builds, and tech discussions.
Subscribe